SYNDICATE'S GUIDE TO FLY FISHING FOR BEGINNERS
At SYNDICATE, we have a passion for all things fly fishing and outdoors. We believe that fly fishing brings people together, and our goal is to attract more people to the sport. So, we developed this beginner's guide to all things fly fishing. We hope that it will give a little more clarity on what the sport is and why we care about it so much. If you have questions you don't see answered, reach out to us through our Contact Us page. In the meantime, be sure to check our Learning Center for more in-depth fly-fishing topics.
Fly Fishing Topics To Explore: What is Fly Fishing | Fly Fishing Gear | Setting Up Your Fly Rod & Fly Reel
What is Fly Fishing?
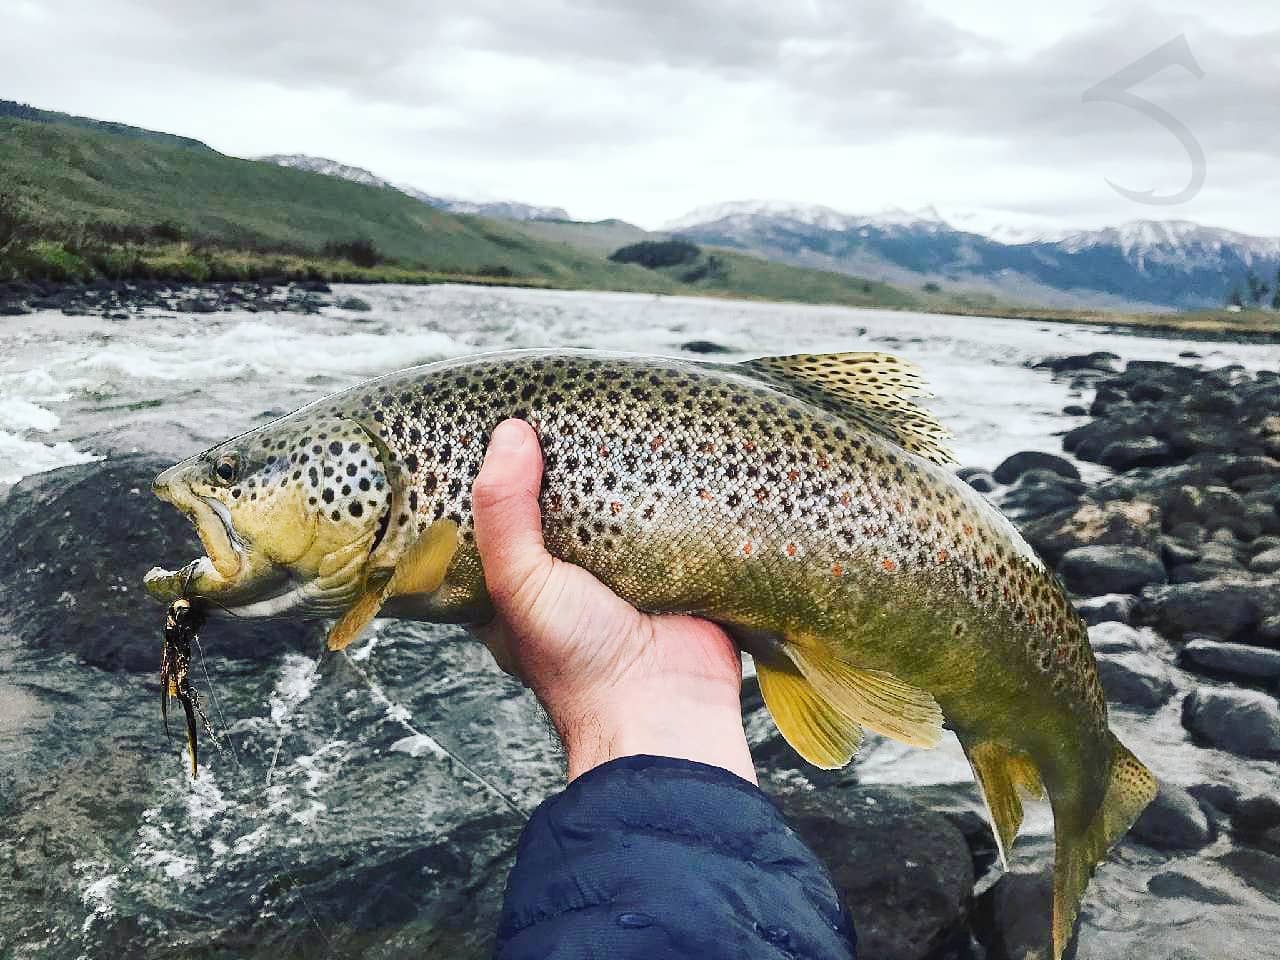
Fly fishing is a form of angling that uses an imitation of a fish’s natural food source, the fly, to fool the fish into eating it. While the exact history of fly fishing is unclear, it can be traced back to the 2nd century. Back then, it was simply a source of food for survival but has been shaped over the years by many men and women into the sport, and passion, that it is today.
Why Go Fly Fishing?
Many anglers these days pursue fly fishing as a form of relaxation amongst the river and the outdoors, but there are also those that seek the competitive side, and even the plain old exploration and adventure of an unknown world.
One true fact is that many fish live in beautiful places, and for some, it is that which drives them to pursue fish with a fly. The adventure in exploring a new river or lake, possibly in a backcountry scenario that is seemingly void of other human life can be a fly fisher’s happy place.
For others, it may be the thrill of competition. Competitive fly fishing has been around for many years, but has taken on a large following in last decade.
Because fly fishing is a sport in which almost anybody can learn, it is only a matter of each angler finding their own favorite reasons to fish.
FLY FISHING GEAR
What Fly Gear is Needed to Fly Fish?
Like most sports, fly fishing requires specialized equipment in order to perform correctly. While the amount of equipment available to go fly fishing is vast, there are certainly some basics that are essential to the sport.
Fly Rod | Fly Reel | Backing | Fly Line | Leader & Tippet | Fly
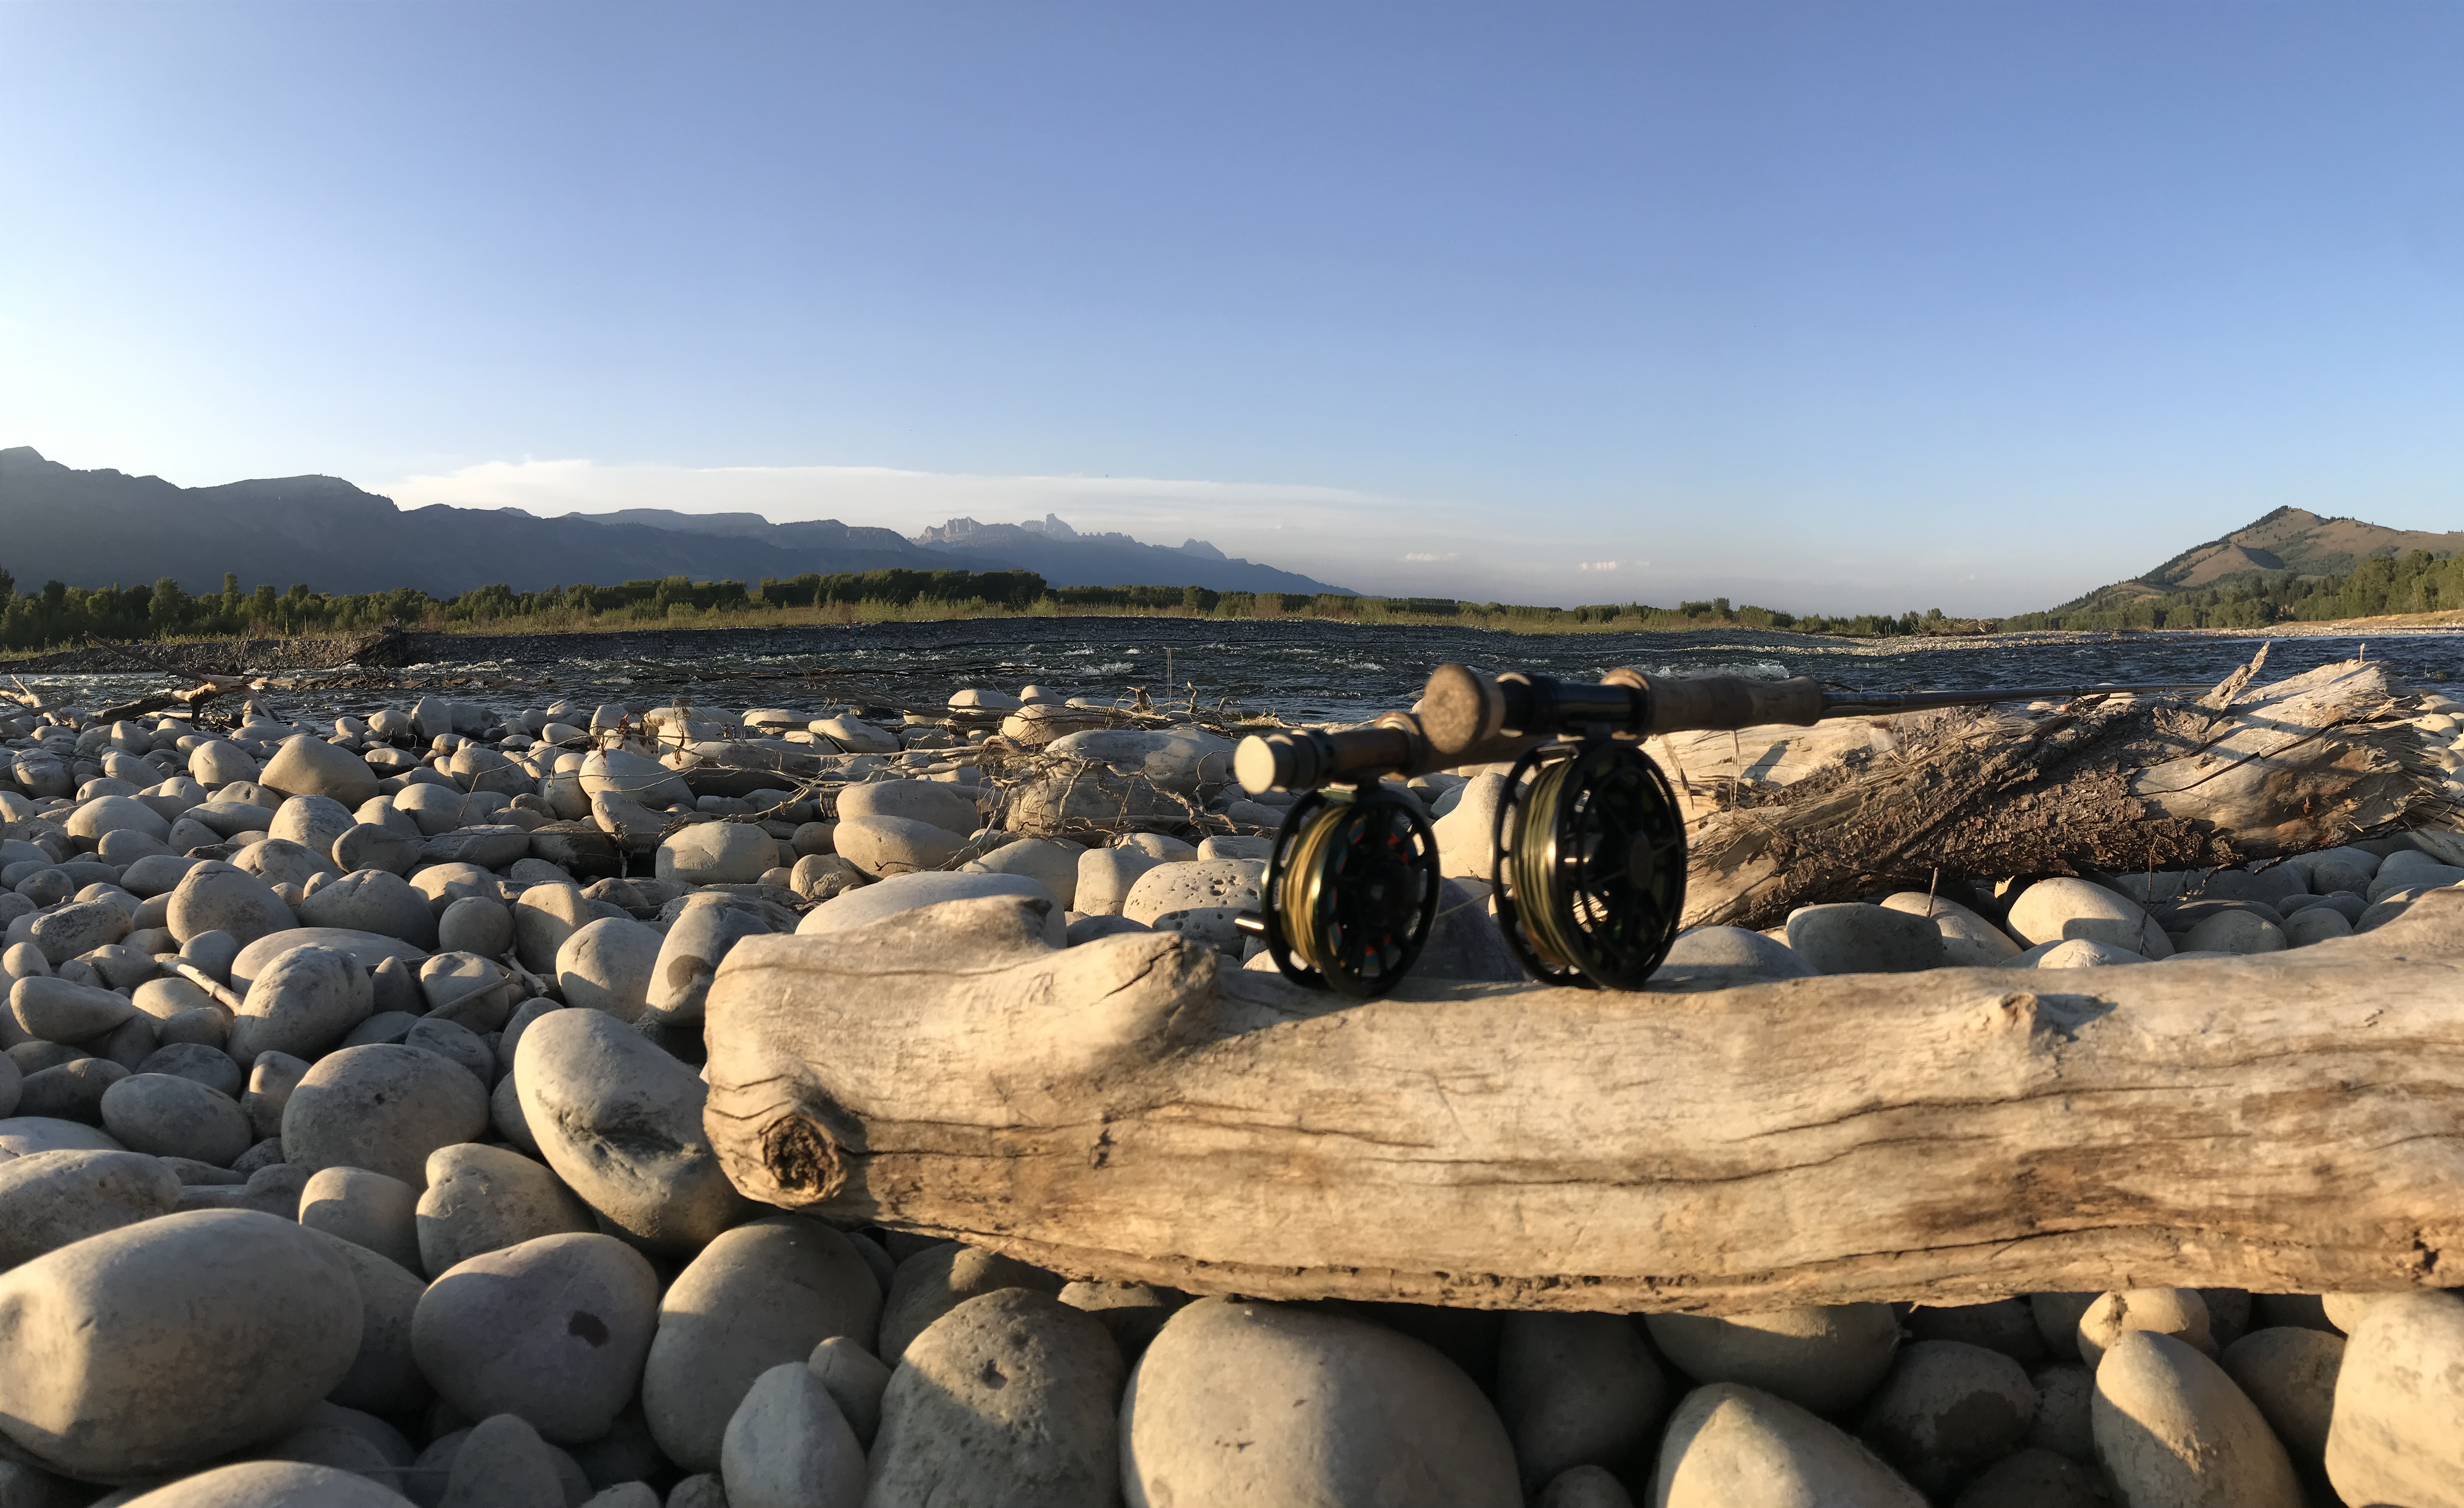
A fly fishing rod is the primary tool for the fly fisher. It allows them to cast the fly, set the hook on a fish, and fight the fish. Most fly rods these days are constructed out of graphite, fiberglass, and bamboo, and come in various lengths, strengths, and actions.
The length of the fly rod will typically range from 7.5 to 13.5 feet with certain applications appealing more to certain lengths. In general, a shorter rod can be a better option in smaller creeks, and vice versa. Probably the most common and versatile length is 9 feet. Of course, transporting a rod of those lengths is difficult in one piece, so most of them will break down into 2-4 sections.
The strength of a fly rod is more commonly known as the weight of the rod and can be labeled as 0-14 with 14 being the strongest. In trout fishing, it can be said that the 5 weight is the most versatile, while an 8 weight can be best for the transition into saltwater fly fishing.
A few examples of length and weight choices might be:
- Chasing small brook or cutthroat trout in little streams in creeks with dense cover might be best done with 7.5 foot 3 weight.
- All around trout fishing might call for a 9-10 foot 4 or 5 weight.
- Larger freshwater fish like bass can be best pursued with a 9-10 foot rod in slightly heavier sizes such as a 6 or 7 weight.
- Toothy freshwater predators like pike and musky might call for a heavy rod in the 8-10 weight and in 9-10 foot lengths as well.
- A 9 foot, 8 or 9 weight will handle all of the bonefish, snook, redfish, and baby tarpon willing to eat a fly.
- Chasing big tarpon? Probably best to suit up with that 9 foot rod in 10-12 weights for holding back on that school bus as it drives away.
- Rods heavier than 12 weight are typically used for marlin, sailfish, and shark endeavors.
Along with the length and weight, fly fishing rods are offered in different actions that are going to affect how the rod performs. Those actions are typically referred to as fast, medium, and slow, but some are also labeled as medium-fast. A fast action rod will bend mostly in the tip section, while a slow action rod will bend throughout the rod. Generally, a fast action rod may be considered a better tool for casting distances, casting in the wind, or casting larger flies while a slow action rod is seen as a better delicate dry fly rod for shorter distances and more bend with smaller fish. It is equally as important to consider the anglers casting stroke and which action is better for them.
For tips on choosing the correct fly rod for you, click here.
Parts of a Fly Rod
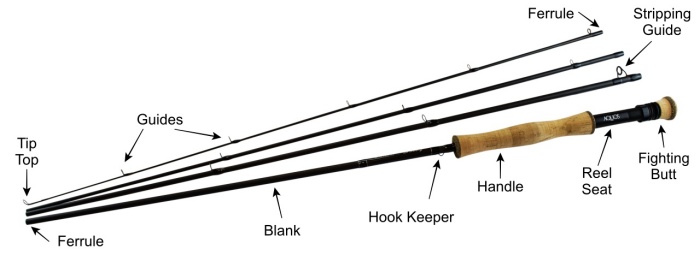
Blank – The blank of the fly fishing rod is the actual rod, usually constructed from graphite, fiberglass, or bamboo.
Ferrule – This is the connection at which the fly rod sections are put together. Ferrules refer to both male and female ends of which the butt section is inserted into the tip section.
Handle – Traditionally, the handle of a fly rod is made out of cork, but other options have been brought to the market in recent years.
Reel Seat – The reel seat is usually made from wood, graphite, or aluminum and includes a hood and lock rings. This is where the fly fishing reel is mounted to the fly rod.
Fighting Butt – This is an extension of the fly rod that gives the angler a little extra leverage while fighting a fish. It can also help to balance a rod and reel outfit. A fighting butt is generally used on heavier weight fly rods, but some European Nymphing rods have them in lightweight sizes as well.
Hook Keeper - The hook keeper is a small wire loop just in front of the handle. It is meant to hook the fly on while not in use. This is not to be confused with a guide and is not meant to run the line through.
Stripping Guide – The stripping guide is the first, and sometimes more, guide on the blank of the rod above the handle. It is usually Titanium with a porcelain liner to limit friction as the fly line passes through it. Tip: do not hook flies to the stripping guide as they can scratch the porcelain, which can damage the fly line.
Guide – The guides run the length of the fly rod blank and hold the fly line in place.
Tip Top – The tip top is the final guide at the tip of the fly rod.
What is a Fly Fishing Reel?
The reel is the spooling device attached to the butt end of the fly rod and its purpose is to contain and control the fly line. The reel consists of two main pieces, the frame, and spool, which can be separated from each other. Attached to the frame are the reel seat, drag knob, and the hub/drag system. The spool contains the crank, counterweight, spool release mechanism, and is where the fly line and backing are spooled. Refer to the image below for a better understanding of each component.
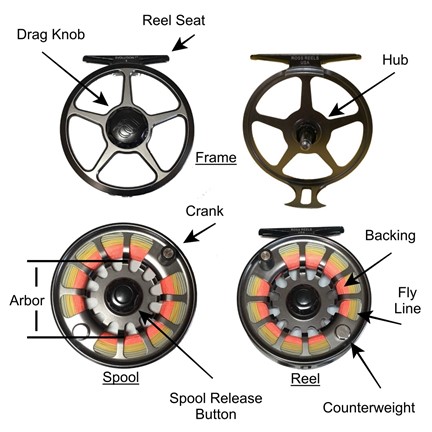
Frame – This is the outer part of the reel that the spool connects to. The frame houses the drag system, which includes the drag knob and the hub.
Drag system – The “drag” refers to the allowance of line to be pulled from the reel and is adjusted by turning the drag knob. Turning the drag knob either direction will open and close the drag. If open, the line can be pulled from the reel easily. If closed, there will be increased tension and it is harder to pull line from the reel. This is used for controlling the line, and the fish once hooked. Some amount of drag should always be engaged while fishing to avoid the reel free spooling and tangling the line.
Drag knob – The knob on the back of the frame that allows the angler to open and close the drag system.
Hub – The hub is the “spindle” in the center of the frame that the spool will slide on to.
Spool – This part, once connected to the frame, spins in both directions at which can be adjusted by the drag system. This part of the reel houses the fly line and backing. It is possible to buy additional spools that fit the same frame to allow the angler to have multiple fly lines ready to fish with the same frame.
Spool release mechanism – This can be a button, a screw, or even a pressure release that will allow the spool to be released from the frame once activated.
Crank – A knob for the angler to hold on to in order to turn the spool and retrieve the fly line and backing.
Counterweight – A balancing feature to counter the weight of the crank on one side of the spool. Without this, the reel would wobble while spinning at high speeds such as when a fish is running with the line.
Arbor – This refers to the internal width of the spool at which the backing and fly line will wrap around. A larger arbor will retrieve line faster with fewer turns than a smaller arbor. A larger arbor can also help reduce memory and coil of the fly line.
Types of Drag Systems in Reels
Click and Pawl – This is essentially a “drag less” reel as it only allows minimal, if any, adjustment to drag tension. This type of drag is great for small, lightweight rod and reel outfits for chasing smaller fish as there is enough tension to prohibit a free spooling of the line, but there is not enough tension to control a large fish. Click and pawl drags usually consist of a spring-tensioned pin pressed against a disc with teeth. As the disc spins, the pin “clicks” between the teeth creating enough tension to not free spool.
Disc Drag – Most modern drag systems are made up of some form of a disc drag where stacked discs are compressed as the drag is closed. These discs will turn easily with an open drag, but as the drag is closed down, the discs compress against each other creating friction and not turning as easily. Most disc drag systems are sealed in a housing to protect them from sediment and require zero maintenance.
Cork drag – This type of drag uses a cork disc to create friction against the spool. As the drag is closed down, the cork is pressed harder against the spool, creating the friction needed to stop the spool from turning. These need more cleaning and lubrication than the first two drag systems mentioned.
Setting Up a Fly Reel
Most fly fishing reels can be set up for right or left handed anglers with a simple position change of the drag system. For a right-handed angler, the reel should be set up with a left hand retrieve. This will mean the angler is casting with their right hand, and then reeling with their left. This will be the opposite for a left-handed angler. Jump down to our How to Set Up a Fly Reel section for a more detialed look. Once the correct retrieve direction is set, it is time to add the backing and fly line.
What is Backing?
Backing is most commonly a thin, braided Dacron material that is spooled on to the reel before the fly line. There are two reasons for backing.
Fly lines are typically 90-100 feet long and if a fish manages to run away with that amount of line, the angler needs more. Using a longer fly line is not ideal as it is too thick and would require a much larger reel. Instead, it is possible to fit a 100-300 yards of backing on the reel without taking up much space. This gives the angler much more room to play the fish.
Another great reason for backing is to fill the arbor of the spool making it larger. This will help in retrieving more line with fewer turns of the reel, as well as promoting less coil of the fly line.
These days, backing comes in all sorts of colors so each angler can personalize their reel, but it also comes in different materials and strengths to accommodate different types of fishing.
For freshwater fly fishing, braided Dacron with a 20 pound breaking strength is most common. This backing is thin so it doesn’t’ take up too much space on small trout reels.
On the other hand, a different style of backing is needed for fishing in the saltwater as it needs to be stronger, but still thin diameter. The breaking strength of this backing should be in the 30-70 pound range. In order to keep a thin diameter and large breaking strength, the backing is made from Polyethylene (PE) strands woven together. PE backing stays round when stretched and is most resistant to UV and abrasion than any other backing.
What is a Fly Line?
Next up, and probably the most important piece to the puzzle, along with the fly rod, is the fly line. The fly line is where the fly angler gets the weight needed to cast lightweight flies to any distance. Unlike spin or bait cast fishing where the angler has a heavy lure to pull the line from the reel and continue the trajectory of the cast, fly fishing requires a weighted line. The weight in the line is what carries the remaining line from the reel, as well as continues the trajectory of the fly along the path of the cast.
Fly lines are usually 80-100 feet in length and made from PVC or Polyurethane extruded onto a Dacron or monofilament core. Each line has a similar but unique shape that will include a long, thin, mostly level section at the rear of the line, then a rear taper, a belly, and a front taper leading to the tip of the line. The most common type of fly fishing line is a weight forward, floating line, as pictured below.

The weight is in the front of the line, which is why it is referred to as a weight forward line. This particular line would be made to float, making it a weight forward, floating line that would be labeled as WF-X-F where “X” is the line size that matches up to the anglers fly rod weight. Other types of fly lines are available in Double Tapers and sinking lines, as well as various other styles of weight forward lines. For a more in depth look at fly lines, check out the article on Choosing the Right Fly Line.
It is the weight in the head of the fly line that will carry the running line through the air on during the cast. The head also is responsible for pushing the leader, tippet, and fly through the air during the cast.
What is Leader and Tippet?
From the fly line, a leader is needed to taper down small enough to tie a fly on to. The leader is usually made of Nylon or Fluorocarbon material and most commonly found in 7.5-9 foot lengths but can be more or less depending on its intended use. This leader will have a thick end and a thin end, with the thick end being the butt end that attaches to the fly line. It then tapers down to the tippet end that is significantly thinner in diameter than the butt end, as the image shows below.

A fly can be tied to the tippet end of the leader, but the leader will get thicker each time a fly is clipped off and another one is tied on. Eventually, it would be too thick to tie a fly on. For this reason, tippet should be added to the end of the leader.
Tippet is a length of single diameter (no taper) fishing line that is made from nylon or fluorocarbon and can typically be purchased in 30-yard spools. This tippet is to be tied on to the tippet end of the leader. This allows the angler to save the leader, as well as taper down to a thinner diameter line when needed.
Leader and Tippet Sizes
Leaders and tippets are rated by breaking strength, which is directly related to the diameter of the line. This rating is labeled as the “X” factor. The thicker the diameter of the line, the smaller number “X” factor the line will be. For example, a 3x tippet will be larger in diameter, and thus stronger than a 5x tippet. Both lines are commonly available in 0x-7x sizes but can even run outside that range at times.
Leaders will be labeled by length and strength, such as 9ft 4x. This means the leader is 9 feet long and tapers from a thick butt section, down to a thin tippet section that terminates at a 4x tippet. A standard tippet spool will be labeled with the “X” factor.
This “X” factor is important when tying leaders and tippets together, as it is a good idea to always taper down and to not connect two lines that are vastly different in diameter.
Tapering down will allow the energy of the fly cast to continue through the leader and tippet, making for an efficient casting situation. Also, by tapering down, the breaking point of the entire set up will always be as far down the line as possible. By having the weakest point at the fly rather than somewhere in the leader, only the fly will usually break off as opposed to the leader. The idea is to break off as little of the leader and tippet as possible.
When tying any lines together, especially tippet to leader, it is a good idea to be sure the two lines are close in diameter to each other. A general rule of thumb is that the two lines should be within two “X” factors of each other. This will ensure the knot is secure as two lines that are largely different diameters will often not tie together well, creating a failure point in the leader.
For example, when starting with a 9ft 4x leader, only 4x or 5x tippet should be added. It is possible to add 6x, but that is a large difference in diameter and not recommended as the breaking point would most likely be at that knot instead of the fly.
What is a Fly?
A fly is essentially the bait, although it is made of natural and synthetic materials and only imitates the real bait; it is not live bait. Flies come in a variety of sizes and are hand tied to a hook in order to look like a natural food source for a fish. This food source could be an insect, a terrestrial, a minnow, and even eggs and worms. To imitate these food sources, flies will be made to float or sink and fished in a manner of which the natural food would be found. Without a complete knowledge of entomology, a fly fisher can still head out to the water with a good chance of catching fish by carrying a variety of nymphs, dry flies, and streamers.
Nymphs
In the realm of aquatic insects, there are multiple stages of life. The nymphal stage is where the insect is living underwater, often crawling around the rocks and substrate. With the vast number of species in the river, the nymphal stage of an insect is the most easily accessible to fish, especially in rivers where the current can overtake the nymph and send it drifting downstream.
While the term “nymph” does refer directly to a stage of an aquatic insects life cycle, it is used as a broader term in fly fishing. In general, a nymph is any fly an angler uses that will be presented to the fish underwater. These flies may have a bead on them, known as a “beadhead,” that will help them sink in the water rather than float, but may also come without a bead. Some examples of nymphs are:
Dry Flies
Another stage of an aquatic insects’ life is the adult stage, at which time they have wings and live above the surface. This is the stage at which the fly fisher imitates the food source with a dry fly. Dry flies will also imitate terrestrials, such as grass hoppers, cicadas, ants, beetles, etc., all of which will float on the surface of the water. The idea is to entice the fish to “rise” to eat the fly and is best done during a “hatch” when the insect is most prevalent.
Dry flies will typically have a bushy appearance and be made out of feathers and foam. Some common dry flies are:

Streamers
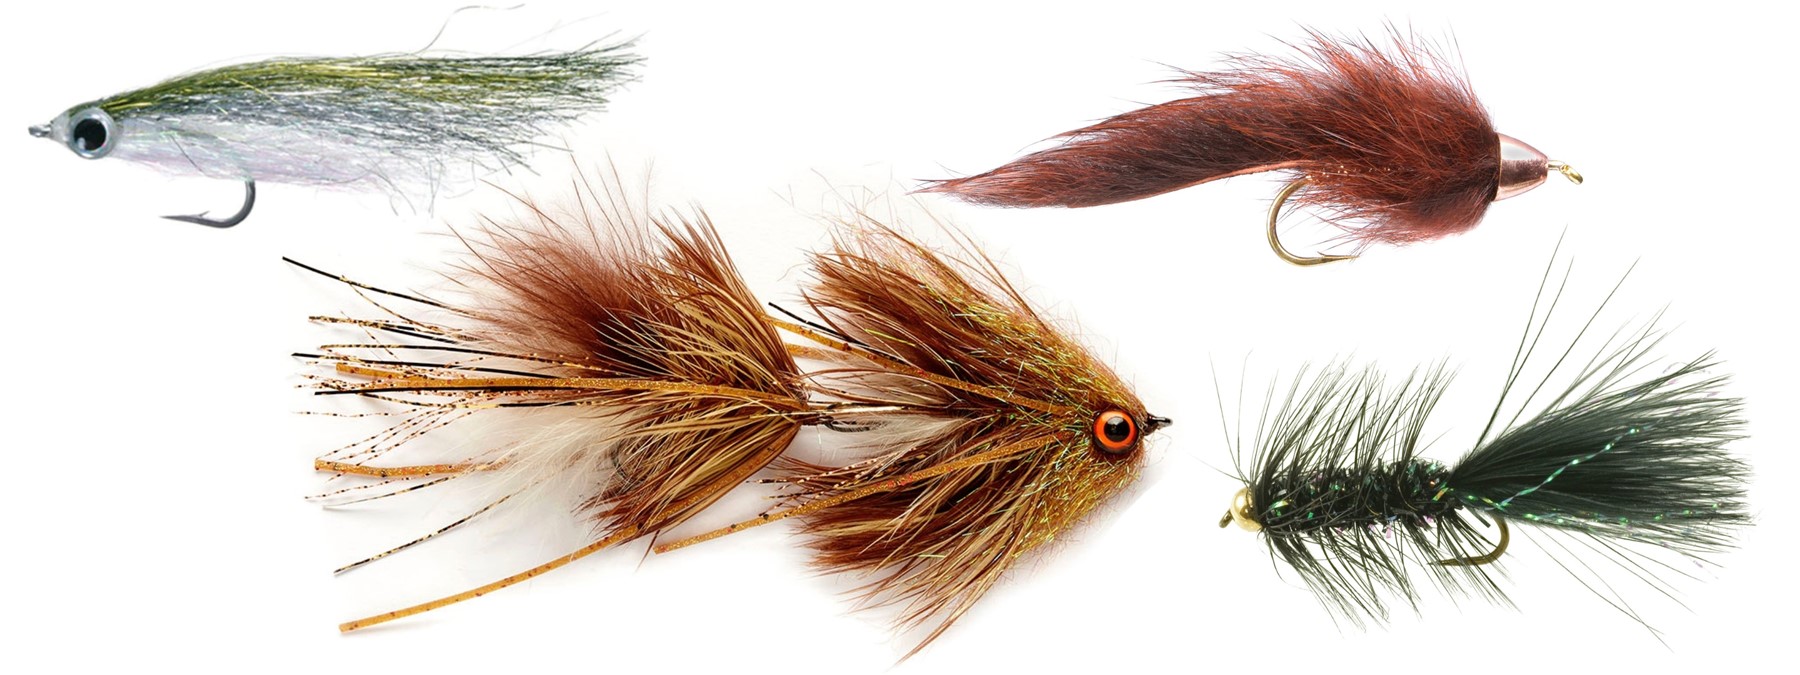
When streamer fishing, the angler is imitating a forage fish such as a minnow. These forage fish can include any small fish in the waterway including the target fishes own species. Streamers are most commonly swam through the water, done by the angler casting them out and retrieving them quickly, or swinging them across the current.
There are many types of streamers on the market today, some of which will include more than one hook, and are articulated to add extra swimming motion to the fly while in the water. Some common streamers one will find for sale are:
SETTING UP YOUR FLY ROD & FLY REEL
How to Set Up a Fly Rod
As with all new adventures, there is a learning curve. Setting up a fly rod correctly is one of those learning curves that will become second nature with repetition. Before tying on a fly and casting it to a fish, one will need to know how to set up the fly rod, fly reel, and the accompanying fly fishing lines.
Putting Your Fly Rod Together
As discussed prior, fly rods are most commonly made in four sections, but can be more or less. Putting these sections together correctly will not only make the rod perform as it should, but can also protect the ferrules of the rod.
It is important to always put the rod sections together starting with the tip section and working down to the butt section. The tip section is the most fragile section and should not be used to hold the weight of the rest of the rod while putting it together.
Some rods will have dots on each ferrule to help in aligning the rod sections. Those that do not can be aligned by visually by looking down the rod through the guides. While holding the tip section in one hand, and the next section in the other hand, begin to insert one ferrule inside the other, but at quarter turn off set. As the ferrules are connected, finish the connection with a quarter turn to align the rod, either by dots or visual. Giving that quarter turn will help seat the rod sections together securely. This fit should be snug, but not overpowered! Using a ferrule wax can greatly extend the life of the ferrules as well.

How to Set Up a Fly Reel
When purchasing a reel, it is recommended to go to a local fly fishing store where the staff can spool the backing and fly line correctly. If that is not an option, one will need to know the correct method in setting up the reel prior to putting it on the fly rod. Also, it is a good idea to know how to perform the setup in case a repair or replacement is needed when a fly shop is not available. The reel will need to be set to the anglers retrieve direction, then be spooled the correct direction with backing and fly line.
The first line to be spooled onto the reel is the backing. The backing is tied to the arbor of the spool with an “arbor knot.” Depending on the reel, and type of fishing that will be done, anywhere from 50 to 400 yards of backing may be spooled, then tied to the fly line. If the fly line has a welded loop on it, a simple “loop-to-loop” connection is easiest, but a “nail knot” is necessary if when the fly line does not have a loop in the end.
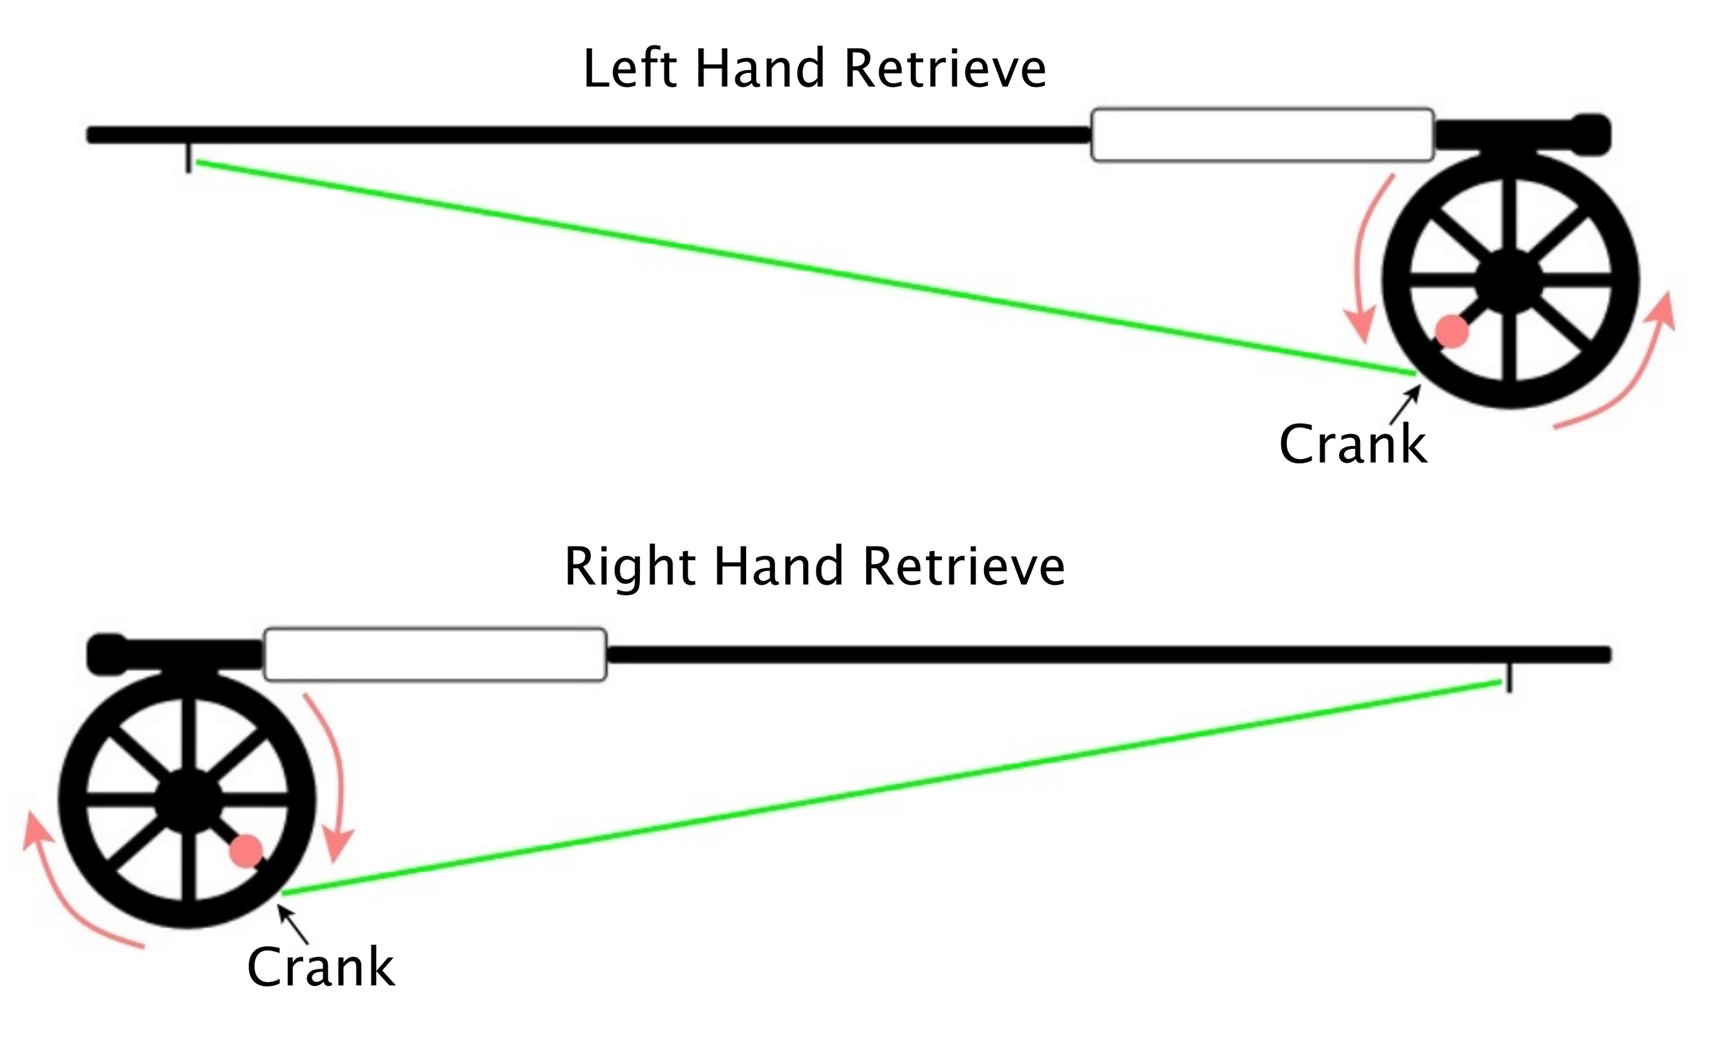
Prior to spooling, one must first determine the casting arm, and reel hand. Most commonly, the angler’s dominant hand will be the casting arm, while the opposite hand will be the reel hand. If the angler is right hand dominant, the reel should be set up for their left hand and will be referred to as “left hand retrieve.” A “right hand retrieve” reel would then be set up to an angler’s right hand. This will set the drag to the correct orientation while the angler holds the rod and retrieves the line by reeling over the top, and away from them. The reel will then need to be placed onto the fly rod in the correct direction based on the retrieve direction so that the line feeds from the bottom of the reel.
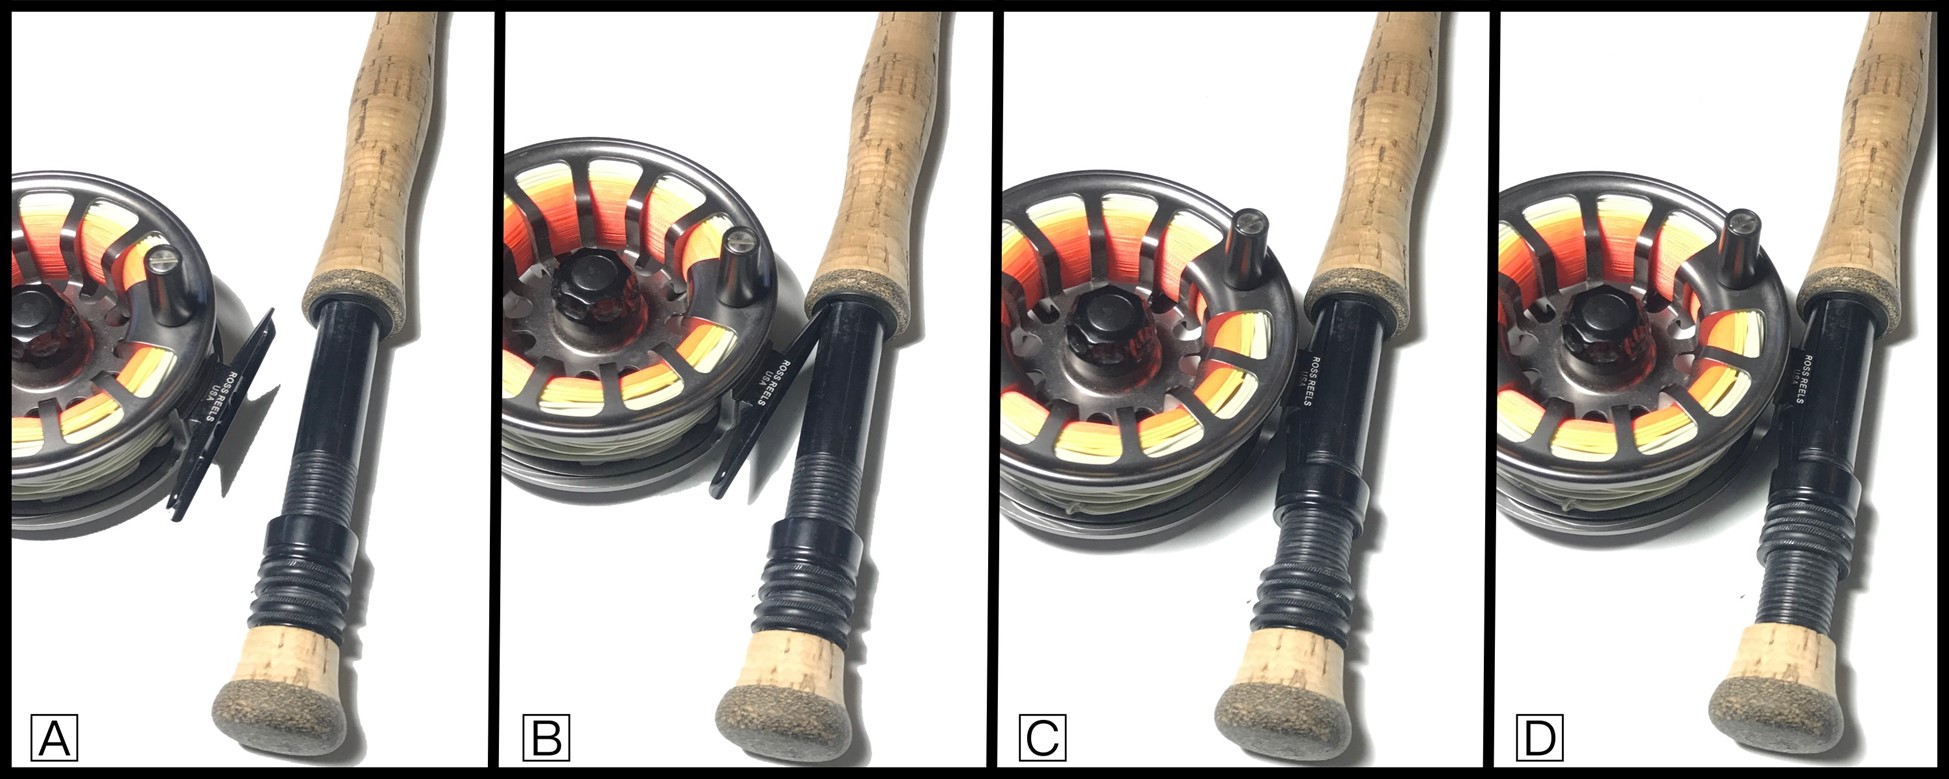
The reel will fit onto the reel seat of the fly rod by way of sliding the reel foot into the hood of the real seat (B), and then sliding the locking ring over the opposite end of the reel foot (C). Finish attaching the reel by twisting the locking rings forward until snug (D). Do not over-tighten!
Stringing Your Fly Rod
“Stringing” the fly rod is the act of setting the fly line through each of the guides along the rod. To make this easier, pull about a rods length of fly line from the reel and then loop it over itself. Passing this loop through each guide is easier to handle than a single strand of fly line, as well as if it slips from one’s fingers, it will usually stop itself rather than sliding back through each guide. Be sure to line each guide on the rod as missing one will affect casting!
Tying It All Together
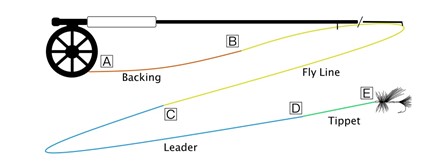
As discussed before, but now noted in the diagram below, the backing is tied to the reel with an arbor knot (A) then a Loop-to-loop knot to connect the fly line to the backing (B). Now comes time to add the leader to the fly line (C). This is easiest done with a loop-to-loop knot as long as the fly line and the leader both have loops in them. If not, a nail knot will also make a strong connection, and often times, one that passes through the guides easier than the loop-to-loop connection. Next up is adding tippet to the end of the leader. There are a few knots that can be used here but the most common are the “double surgeons knot” or the “blood knot.” Both work well and really depend on the comfort of the angler in tying them to decide between them. Finally, it’s time to tie on a fly and go fishing! For a more in-depth look at how to set up a fly rod for specific styles of fishing, please visit the Learning Center.
