What Is Indicator Nymphing?
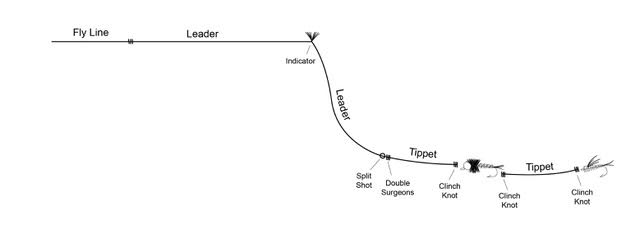
Let’s face the facts, most of a trout’s diet is subsurface. This makes it necessary to know how to present nymphs to trout while also being able to detect when they eat those nymphs. One way to detect those strikes is with a “strike indicator,” which is essentially a bobber. The method of indicator nymphing is done with one or more nymphs, split shot, and the strike indicator, all on a tapered leader. Once rigged, the idea is to get the nymphs to drift along, perfectly with the current, and imitate a drifting insect. To do this takes some practice, trial, error, and especially repetition.

Indicator Nymphing - Leader
Typically, it is best to use a longer, tapered leader to be able to cover every depth of water efficiently. A leader in the 9-15 foot range is ideal for most indicator nymphing situations, and especially one with a shorter, more powerful taper to turn over the heavy rig.
Fluorocarbon leaders and tippet can be a great choice here as it is more abrasion resistant, less visible underwater, and slightly heavier than nylon. At the very least, it is a good idea to use fluorocarbon tippet, even if using a nylon leader.
Indicator Nymphing - Indicator
There are many types of strike indicators on the market and choosing the correct one is mostly a personal preference situation. Most indicators these days are made from foam, plastic, yarn, or wool and attach to the line in various ways, some easier than others.
When choosing an indicator, consider the way it attaches, but also the “castability” and sensitivity. Typically, an indicator made of plastic will be less sensitive and harder to cast than one made from yarn or wool, but will also be easier to attach and require less maintenance.
An experienced indicator fisher will understand that the strike indicator becomes a “drift indicator” first, a suspension device second, and a strike detector third. This is because the angler should always focus on the flies first to understand where they are in the drift in relation to the indicator and the target. Watching the flies until they can no longer be seen can result in more hook ups than focusing solely on the indicator. Rely on the indicator once the flies can’t be seen.
A good rule of thumb as to where the indicator should be on the line is to set it at a length about 1.5 times the depth of the water. This will vary with faster or slower water, and can also be adjusted to keep the flies out of a weedy bottom. For example, if the water to be fished is 2 feet deep, starting with 5 feet between the split shot and indicator will be a great starting place. Adjust this length as needed depending on the amount of bottom snags, or not catching fish!

What's A Split Shot (weight)?
When nymphing, sometimes it is necessary to add extra weight to the line to get the flies down to where the fish are feeding. This weight is usually called split shot and will be placed about 14-16 inches above the first fly in order to get the flies down to the level at which the fish are feeding.
Like indicators, there are many types of split shot options on the market.
The heaviest options will usually be made of lead, which can be toxic to marine environments, so other options are available as well. Consider using a split shot made of tin or tungsten in place of lead. In most situations, using both can be the best option.
Placing a tin split shot on the line, then wrapping a moldable tungsten putty around that split shot will yield the best results while allowing for small adjustments by adding or removing bits of the tungsten putty. To achieve more weight, consider using a tungsten split shot as a base for the tungsten putty.
Adjusting the weight should be a regular task for each different type of water to be fished. In fact, before changing flies, the weight should be adjusted, as the difference between catching fish and not catching fish can be in one split shot.
Indicator Nymphing - Flies
While most standard nymphs are going to be effective with indicator nymphing, there are some ways to improve the odds of those flies catching fish. What this really boils down to is the weight of the fly. By using weighted, non-weighted, or even buoyant flies, different levels of the water column can be fished more effectively.
A non-weighted fly will need more split shot to get deeper, but can also be beneficial in shallower water as it is less likely to snag up in the rocks, etc. It can also look a little more realistic as it drifts through the water, not sinking, but not floating either.
On the other hand, a heavily weighted fly will take less split shot to get down in heavy water, but may also look less realistic as it sinks like a rock! This is beneficial in fast and deep water to get the flies down in front of that fish that would normally only see the split shot as it went by with the flies floating up above it.
Another great fly to fish on a nymph rig is one with foam to make it want to float. As the split shot drags it down, the fly will want to float, making it appear as an emerging bug. It is a good idea to consider the weight of the flies and how to make the most realistic presentation for each different type of water to be fished.
